第8章 muduo网络库设计与实现
0. 什么都不做的EventLoop
首先定义EventLoop
class的基本接口:构造函数、析构函数、loop()成员函数。注意EventLoop是不可拷贝的,因此它继承了boost::noncopyable。muduo中的大多数class都是不可拷贝的,因此以后只会强调某个class是可拷贝的。
1
2
3
4
5
6
7
8
9
10
11
12
13
14
15
16
17
class EventLoop : boost::noncopyable {public :EventLoop ();EventLoop ();void loop () void assertInLoopThread () if (!isInLoopThread ()) {abortNotInLoopThread ();bool isInLoopThread () const return threadId_ == CurrentThread::tid (); }private :void abortNotInLoopThread () bool looping; const pid_t threadId_;
One looper
thread顾名思义每个线程只能有一个EventLoop对象 ,因此EventLoop的构造函数会检查当前线程是否已经创建了其他EventLoop对象,遇到错误就终止程序(LOG_FATAL)。EventLoop的构造函数会记住本对象所属的线程(threadId_)。
创建了EventLoop对象的线程是IO线程 ,其主要功能是运行事件循环EventLoop:loop()。EventLoop对象的生命期通常和其所属的线程一样长 ,它不必是heap对象。
1
2
3
4
5
6
7
8
9
10
11
12
13
14
15
16
17
18
__thread EventLoop* t_loopInThisThread = 0 ;EventLoop ()looping_ (false ),threadId_ (CurrentThread::tid ()) {"EventLoop created" << this << " in thread " << threadId_;if (t_loopInThisThread) {"Another EventLoop " << t_loopInThisThread" exists in this thread " << threadId_;else {this ;EventLoop () {assert (!looping_);NULL ;
既然每个线程至多有一个EventLoop对象,那么我们让EventLoop的static成员函数getEventLoopOfCurrentThread()返回这个对象。返回值可能为NULL,如果当前线程不是IO线程的话。(这个函数是muduo后来新加的,因此前面头文件中没有它的原型。)
1
2
3
EventLoop* EventLoop::getEventLoopOfCurrentThread () {return t_loopInThisThread;
muduo的接口设计会明确哪些成员函数是线程安全的,可以跨线程调用:哪些成员函数只能在某个特定线程调用(主要是IO线程)。为了能在运行时检查这些pre-condition,EventLoop提供了isInLoopThread()和assertInLoopThread()等函数。
事件循环必须在IO线程执行 ,因此EventLoop::loop()会检查这一pre-condition。本节的loop()什么事都不做,等5秒就退出。
1
2
3
4
5
6
7
8
void EventLoop::loop () assert (!looping_);assertInLoopThread ();true ;poll (NULL , 0 , 5 *1000 );"EventLoop " << this << " stop looping" ;false ;
为了验证现有的功能,我编写了s00/test1.cc和s00/test2.cc。其中test1.cc会在主线程和子线程分别创建一个EventLoop,程序正常运行退出。
1
2
3
4
5
6
7
8
9
10
11
12
13
14
void threadFunc () printf ("threadFunc(): pid=%d, tid=%d\n" , getpid (), muduo::CurrentThread::tid ());loop ();int main () printf ("main(): pid=%d, tid=%d\n" , getpid (), muduo::CurrentThread::tid ());muduo::Thread thread (threadFunc) ;start ();loop ();pthread_exit (NULL );
test2.cc是个负面测试,它在主线程创建了EventLoop对象,却试图在另一个线程调用其EventLoop::loop(),程序会因断言失效而异常终止。练习:写一个负面测试,在主线程创建两个EventLoop对象,验证程序会异常终止。
1
2
3
4
5
6
7
8
9
10
11
12
muduo::EventLoop* g_loop;void threadFunc () loop ();int main () muduo::Thread t (threadFunc) ;start ();join ();
1. Reactor的关键结构
本节讲Reactor最核心的事件分发机制 ,即将IO
multiplexing拿到的IO事件分发给各个文件描述符(fd)的事件处理函数。
1.1 Channel class
Channel class的功能有一点类似Java
NIO的SelectableChannel和SelectionKey的组合。
每个Channel对象自始至终只属于一个EventLoop,因此每个Channel对象都只属于某一个IO线程 。
每个Channel对象自始至终只负责一个文件描述符(fd)的IO事件分发,但它并不拥有这个fd,也不会在析构的时候关闭这个fd。
Channel会把不同的IO事件分发为不同的回调,例如ReadCallback、WriteCallback等,而且“回调”用boost::function表示,用户无须继承Channel,Channel不是基类。
muduo用户一般不直接使用Channel,而会使用更上层的封装,如TcpConnection。Channel的生命期由其owner
class负责管理,它一般是其他class的直接或间接成员。
1
2
3
4
5
6
7
8
9
10
11
12
13
14
15
16
17
18
19
20
21
22
23
24
25
26
27
28
29
30
31
32
33
34
35
36
37
38
39
40
41
42
43
44
class Channel : boost::noncopyable {public :typedef boost::function<void ()> EventCallback;Channel (EventLoop* loop, int fd);void handleEvent () void setReadCallback (const EventCallback& cb) void setWriteCallback (const EventCallback& cb) void setErrorCallback (const EventCallback& cb) int fd () const return fd_; }int events () const return events_; }void set_revents (int revt) bool isNoneEvent () const return events_ == kNoneEvent; }void enableReading () update (); }void enableWriting () update (); }int index () return index_; }void set_index (int idx) EventLoop* ownerLoop () { return loop_; }private :void update () static const int kNoneEvent;static const int kReadEvent;static const int kWriteEvent;const int fd_;int events_;int revents_;int index_;
以下是Channel
class的数据成员。其中events_是它关心的IO事件,由用户设置;revents_是目前活动的事件,由EventLoop/Poller设置:这两个字段都是bit
pattern,它们的名字来自poll(2)的struct pollfd。
1
2
3
4
5
6
7
8
9
10
11
12
13
14
const int Channel::kNoneEvent = 0 ;const int Channel::kReadEvent = POLLIN | POLLPRI;const int Channel::kWriteEvent = POLLOUT;Channel (EventLoop* loop, int fdArg)loop (loop),fd_ (fdArg),events_ (0 ),revents_ (0 ),index_ (-1 ) {}void Channel::update () updateChannel (this );
Channel::update() 会调用 EventLoop::updateChannel(),后者会转而调用
Poller::updateChannel()。由于 Channel 没有包含 EventLoop.h,因此
Channel::update() 必须定义在 Channel.cc 中。
Channel::handleEvent是Channel的核心,它由EventLoop::loop()调用,它的功能是根据revents_的值分别调用不同的用户回调。这个函数以后还会扩充。
1
2
3
4
5
6
7
8
9
10
11
12
13
14
void Channel::handleEvent () if (revents_ & POLLNVAL) {"Channel::handle_event() POLLNVAL" ;if (revents_ & (POLLERR | POLLNVAL)) {if (errorCallback_) errorCallback_ ();if (revents_ & (POLLIN | POLLPRI | POLLRDHUP)) {if (readCallback_) readCallback_ ();if (revents_ & POLLOUT) {if (writeCallback_) writeCallback_ ();
1.2 Poller class
Poller class是IO
multiplexing的封装。它现在是个具体类,而在muduo中是个抽象基类,因为muduo同时支持poll(2)和epoll(4)两种IO
multiplexing机制。Poller是EventLoop的间接成员,只供其owner
EventLoop在IO线程调用,因此无须加锁。其生命期与EventLoop相等。Poller并不拥有Channel,Channel在析构之前必须自已unregister(EventLoop::removeChannel()),避免空悬指针。
1
2
3
4
5
6
7
8
9
10
11
12
13
14
15
16
17
18
19
20
21
22
class Poller : boost::noncopyable {public :typedef std::vector<Channel*> ChannelList;Poller (EventLoop* loop);Poller ();Timestamp poll (int timeoutMs, ChannelList* activeChannels) ;void updateChannel (Channel* channel) void assertInLoopThread () assertInLoopThread (); }private :void fillActiveChannels (int numEvents, ChannelList* activeChannels) const typedef std::vector<struct pollfd> PollFdList;typedef std::map<int , Channel*> ChannelMap;
Poller供EventLoop调用的函数目前有两个,poll()和updateChannel(),Poller暂时没有定义removeChannel()成员函数,因为前几节还用不到它。
private 是Poller
class的数据成员。其中ChannelMap是从fd到Channel*的映射。Poller::poll()不会在每次调用poll(2)之前临时构造pollfd数组,而是把它缓存起来(pollfds_)
Poller的构造函数和析构函数都很简单,因其成员都是标准库容器。
1 2 3 4 5 6 Poller::Poller (EventLoop* loop)ownerLoop_ (loop) {Poller () {
Poller::poll()是Poller的核心功能,它调用poll(2)获得当前活动的IO事件 ,然后填充调用方传入的activeChannels,并返回poll(2)
return的时刻。这里我们直接把vector<struct pollfd>
pollfds_作为参数传给poll(2),因为C++标准保证std::vector的元素排列跟数组一样。&*pollfds_.begin()是获得元素的首地址,这个表达式的类型为pollfds_*,符合poll(2)的要求。(在C++11中可写为pollfds_.data),g++4.4的STL也支持这种写法。
1
2
3
4
5
6
7
8
9
10
11
12
13
Timestamp Poller::poll (int timeoutMs, ChannelList* activeChannels) {int numEvents = ::poll (&*pollfds_.begin (), pollfds_.size (), timeoutMs);Timestamp now (Timestamp::now()) ;if (numEvents > 0 ) {" events happened" ;fillActiveChannels (numEvents, activeChannels);else if (numEvents == 0 ) {"nothing happened" ;else {"Poller::poll()" ;return now;
fillActiveChannels()遍历pollfds_,找出有活动事件的fd,把它对应的Channel填入activeChannels 。这个函数的复杂度是O(N),其中N是pollfds_的长度即文件描述符数目。为了提前结束循环,每找到一个活动fd就递减numEvents,这样当numEvents减为0时表示活动fd都找完了,不必做无用功。当前活动事件revents会保存在Channel中,供Channel::handleEvent()使用。
注意这里我们不能一边遍历pollfds_,一边调用channel::handleEvent(),因为后者会添加或删除Channel,从而造成pollfds_在遍历期间改变大小,这是非常危险的。另外一个原因是简化Poller的职责,它只负责IO
multiplexing,不负责事件分发(dispatching)。这样将来可以方便地替换为其他更高效的IO
multiplexing机制,如epoll(4)。
1
2
3
4
5
6
7
8
9
10
11
12
13
14
void Poller::fillActiveChannels (int numEvents, ChannelList* activeChannels) const for (PollFdList::const_iterator pfd = pollfds_.begin ();end () && numEvents > 0 ; ++pfd) {if (pfd->revents > 0 ) {find (pfd->fd);assert (ch != channels_.end ());assert (channel->fd () == pfd->fd);set_revents (pfd->revents);push_back (channel);
Poller::updateChannel()的主要功能是负责维护和更新pollfds_数组。添加新Channel的复杂度是O(logN),更新已有的Channel的复杂度是O(1),因为Channel记住了自已在pollfds_数组中的下标,因此可以快速定位。removeChannel()的复杂度也将会是O(logN)。这里用了大量的assert来检查invariant。
1
2
3
4
5
6
7
8
9
10
11
12
13
14
15
16
17
18
19
20
21
22
23
24
25
26
27
28
29
30
void Poller::updateChannel (Channel* channel) assertInLoopThread ();"fd=" << channel->fd () << " events=" << channel->events ();if (channel->index () == -1 ) {assert (channels_.find (channel->fd ()) == channels_.end ());struct pollfd pfd;fd ();static_cast <short >(channel->events ());0 ;push_back (pfd);int idx = static_cast <int >(pollfds_.size ()) - 1 ;set_index (idx);else {assert (channels_.find (channel->fd ()) != channels_.end ());assert (channels_[channel->fd ()] == channel);int idx = channel->index ();assert (0 <= idx && idx < static_cast <int >(pollfds_.size ()));struct pollfd & pfd = pollfds_[idx];assert (pfd.fd == channel->fd () || pfd.fd == -1 );static_cast <short >(channel->events ());0 ;if (channel->isNoneEvent ()) {-1 ;
另外,如果某个Channel暂时不关心任何事件,就把pollfd.fd设为-1,让poll(2)忽略此项。这里不能改为把pollfd.events设为0,这样无法屏蔽POLLERR事件。改进的做法(p.312)是把pollfd.fd设为channel->fd()的相反数减一,这样可以进一步检查invariant。(思考:为什么要减一?)
Tips:
关于为什么要将pollfd.fd设置为channel->fd()的相反数减一,而不是直接设置为0或-1,这里有几点考虑:
区分有效和无效的文件描述符 :通过将pollfd.fd设置为-channel->fd() - 1,可以确保这个值与任何有效的文件描述符都不同。因为文件描述符是非负整数,所以这个负值可以明确表示该pollfd是无效的。避免与0冲突 :在某些情况下,文件描述符0可能被使用,如果简单地将pollfd.fd设置为0,可能会与实际的文件描述符0混淆。检查invariant :通过减一,可以确保在检查invariant时,能够识别出pollfd.fd是否被正确地设置为无效值。如果pollfd.fd的值在-channel->fd() - 1和channel->fd()之间,那么它应该是一个有效的文件描述符。如果等于-channel->fd() - 1,则表示该pollfd是无效的。
1.3 EventLoop的改动
EventLoop
class新增了quit成员函数,还加了几个数据成员,并在构造函数里初始化它们。注意EventLoop通过scoped_ptr来间接持有Poller,因此EventLoop.h不必包含Poller.h,只需前向声明Poller
class。为此,EventLoop的析构函数必须在EventLoop.cc中显式定义。
1
2
3
4
5
6
7
8
9
void EventLoop::abortNotInLoopThread () typedef std::vector<Channel*> ChannelList;bool looping; bool quit; const pid_t threadId_;
EventLoop::loop()有了真正的工作内容,它调用Poller::poll()获得当前活动事件的Channel列表,然后依次调用每个Channel的handleEvent()函数。
1
2
3
4
5
6
7
8
9
10
11
12
13
14
15
16
void EventLoop::loop () assert (!looping_);assertInLoopThread ();true ;false ;while (!quit_) {clear ();poll (kPollTimeMs, &activeChannels_);for (ChannelList::iterator it = activeChannels_.begin ();end (); ++it) {handleEvent ();"EventLoop " << this << " stop looping" ;false ;
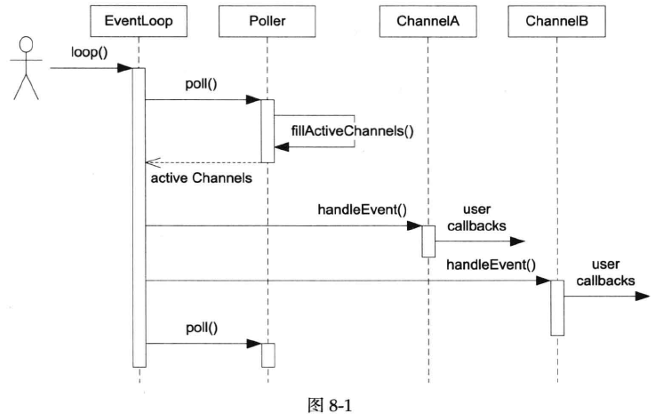
以上几个class尽管简陋,却构成了Reactor模式的核心内容。时序图见图8-1。
Tips:
这段代码和时序图展示了一个基于Reactor模式的事件循环(Event
Loop)的基本工作流程。下面是对代码和时序图的解释:
初始化 :
looping_ 标志被设置为
true,表示事件循环已经开始。assertInLoopThread()
确保当前线程是事件循环所在的线程。 事件循环 :
while (!quit_) 循环是事件循环的核心,它将持续运行直到
quit_ 被设置为 true。 轮询事件 :
activeChannels_.clear();
清空上一次循环中活跃的通道列表。poller_->poll(kPollTimeMs, &activeChannels_);
调用 Poller 的 poll 方法来检查在
kPollTimeMs 毫秒内哪些通道上有事件发生。这个方法会填充
activeChannels_ 列表,包含所有有事件发生的通道。 处理事件 :
循环遍历 activeChannels_ 列表,对每个通道调用
handleEvent()
方法。这是Reactor模式的关键部分,即事件分发器(Event
Loop)将事件分发给相应的处理器(Channel)。
日志记录 :
时序图解释 :
EventLoop :代表事件循环,它调用 loop()
方法开始事件循环。Poller :负责轮询事件,poll()
方法被调用以获取活跃的通道列表。ChannelA 和
ChannelB :代表具体的通道,它们可能代表网络连接或其他类型的事件源。用户回调(user
callbacks) :当通道上有事件发生时,handleEvent()
方法被调用,这通常涉及到执行用户定义的回调函数来处理事件。
时序图中的箭头表示方法调用和事件的流动。例如,当
EventLoop 调用 Poller 的 poll()
方法时,Poller 会填充活跃通道列表并返回给
EventLoop。然后,EventLoop
会遍历这些通道,并对每个通道调用 handleEvent()
方法,这可能会触发用户定义的回调函数。
这个模式允许系统以非阻塞的方式处理多个事件源,是网络编程中常见的一种设计模式。
我们现在可以终止事件循环,只要将quit_设为true即可,但是quit()不是立刻发生的,它会在EventLoop::loop()下一次检查while(!quit_)的时候起效。如果在非当前IO线程调用quit(),延迟可以长达数秒,将来我们可以唤醒EventLoop以缩小延时。但是quit()不是中断或signal,而是设标志,如果EventLoop::loop()正阻塞在某个调用中,quit不会立刻生效。
1
2
3
4
void EventLoop::quit () true ;wakeup ();
EventLoop::updateChannel()在检查断言之后调用Polle::updateChannel(),EventLoop不关心Poller是如何管理Channel列表的。
1
2
3
4
5
void EventLoop::updateChannel (Channel* channel) assert (channel->ownerLoop () == this );assertInLoopThread ();updateChannel (channel);
有了以上的EventLoop、Poller、Channel,我们写个小程序简单地测试一下功能。s01/test3.cc用timerfd实现了一个单次触发的定时器,为S8.2的内容打下基础。这个程序利用Channel将timerfd的readable事件转发给timeout函数。
1 2 3 4 5 6 7 8 9 10 11 12 13 14 15 16 17 18 19 20 21 22 #include <sys/timerfd.h> void timeout () printf ("Timeout!\n" );quit ();int main () int timerfd = ::timerfd_create (CLOCK_MONOTONIC, TFD_NONBLOCK | TFD_CLOEXEC);muduo::Channel channel (&loop, timerfd) ;setReadCallback (timeout);enableReading ();struct itimerspec howlong;bzero (&howlong, sizeof howlong);5 ;timerfd_settime (timerfd, 0 , &howlong, NULL );loop ();close (timerfd);
由于poll(2)是level trigger,在timeout()中应该read()
timefd,否则下次会立刻触发。在现阶段采用level
trigger的好处之一是可以通过strace命令直观地看到每次poll(2)的参数列表,容易检查程序的行为。
2. TimerQueue定时器
有了前面的Reactor基础,我们可以给EventLoop加上定时器功能。传统的Reactor通过控制select(2)和poll(2)的等待时间来实现定时,而现在在Linux中有了timerfd,我们可以用和处理IO事件相同的方式来处理定时,代码的一致性更好。muduo中的backport.diff展示了传统方案。
2.1 TimerQueue class
muduo的定时器功能由三个class实现,TimerId、Timer、TimerQueue,用户只能够看到第一个class,另外两个都是内部实现细节。TimerId和Timer的实现很简单,这里就不展示源码了。
TimerQueue的接口很简单,只有两个函数addTimer()和cancel()。本节我们只实现addTimer(),cancel()的实现见后文。addTimer()是供EventLoop使用的,EventLoop会把它封装为更好用的runAt()、runAfter()、runEvery()等函数。
1
2
3
4
5
6
7
class TimerQueue : boost::noncopyable {public :TimerQueue (EventLoop* loop);TimerQueue ();TimerId addTimer (const TimerCallback& cb, Timestamp when, double interval) ;
值得一提的是TimerQueue的数据结构的选择,TimerQueue需要高效地组织目前尚未到期的Timer,能快速地根据当前时间找到已经到期的Timer,也要能高效地添加和删除Timer。最简单的TimerQueue以按到期时间排好序的线性表为数据结构,muduo最早也是用这种结构。这种结构的常用操作都是线性查找,复杂度是O(N)。
另一种常用做法是二叉堆组织优先队列(libev用的是更高效的4-heap),这种做法的复杂度降为O(logN),但是C++标准库的make_heap()等函数不能高效地删除heap中间的某个元素,需要我们自己实现(令Timer记住自已在heap中的位置)。
还有一种做法是使用二叉搜索树(例如std::set/std::map),把Timer按到期时间先后排好序。操作的复杂度仍然是O(logN),不过memory
locality比heap要差一些,实际速度可能略慢。但是我们不能直接用map<Timestamp,
Timer*>,因为这样无法处理两个Timer到期时间相同的情况 。有两个解决方案,一是用multimap或multiset,二是设法区分key。muduo现在采用的是第二种做法 ,这样可以避免使用不常见的multimap
class。具体来说,以**pair<Timestamp,
Timer*>为key**,这样即便两个Timer的到期时间相同,它们的地址也必定不同。
以下是TimerQueue的数据成员,这个结构利用了现成的容器库,实现简单,容易验证其正确性,并且性能也不错。TimerList是set而非map,因为只有key没有value。TimerQueue使用了一个Channel来观察timerfd_上的readable事件。注意TimerQueue的成员函数只能在其所属的IO线程调用,因此不必加锁。
1
2
3
4
5
6
7
8
9
10
11
12
13
14
15
16
17
18
typedef std::pair<Timestamp, Timer*> Entry;typedef std::set<Entry> TimerList;class TimerQueue : boost::noncopyable {public :TimerQueue (EventLoop* loop);TimerQueue ();void handleRead () std::vector<Entry> getExpired (Timestamp now) ;void reset (const std::vector<Entry>& expired, Timestamp now) bool insert (Timer* timer) private :const int timerfd_;
TimerQueue的实现目前有一个不理想的地方,Timer是用裸指针管理的,需要手动delete。这里用shared_ptr似乎有点小题大做了。在C++11中,或许可以改进为unique_ptr,避免手动管理资源。
来看关键的getExpired()函数的实现,这个函数会从timers_中移除已到期的Timer,并通过vector返回它们。编译器会实施RVO优化,不必太担心性能,必要时可以像EventLoop::activeChannels_那样复用vector。注意其中哨兵值(sentry)的选取,sentry让set::lower_bound()返回的是第一个未到期的Timer的迭代器 ,因此断言中是<而非≤。
1
2
3
4
5
6
7
8
9
std::vector<TimerQueue::Entry> TimerQueue::getExpired (Timestamp now) {make_pair (now, reinterpret_cast <Timer*>(UINTPTR_MAX));lower_bound (sentry);assert (it == timers_.end () || now < it->first);copy (timers_.begin (), it, back_inserter (expired));erase (timers_.begin (), it);return expired;
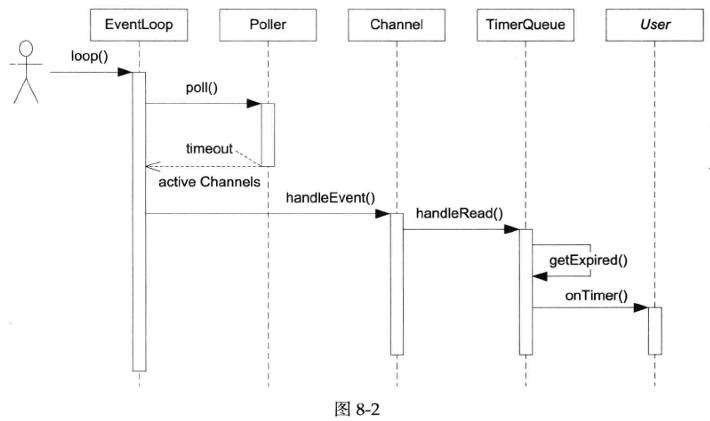
图8-2是TimerQueue回调用户代码onTimer的时序图。
2.2 EventLoop的改动
EventLoop新增了几个方便用户使用的定时器接口,这些函数都转而调用TimerQueue::addTimer()。注意这几个EventLoop成员函数应该允许跨线程使用,比如说我想在某个IO线程中执行超时回调。这就带来线程安全性方面的问题,muduo的解决办法不是加锁,而是把对TimerQueue的操作转移到IO线程来进行 ,这会用到\(\S8.3\) 介绍的EventLoop::runInLoop()函数。
1
2
3
4
5
6
7
8
9
10
11
12
13
TimerId EventLoop::runAt (const Timestamp& time, const TimerCallback& cb) {return timerQueue_->addTimer (cb, time, 0.0 );TimerId EventLoop::runAfter (double delay, const TimerCallback& cb) {Timestamp time (addTime(Timestamp::now(), delay)) ;return runAt (time, cb);TimerId EventLoop::runEvery (double interval, const TimerCallback& cb) {Timestamp time (addTime(Timestamp::now(), interval)) ;return timerQueue_->addTimer (cb, time, interval);
测试代码见s02/test4.cc,这与muduo正式的用法完全一样。
3. EventLoop::runInLoop()函数
EventLoop有一个非常有用的功能:在它的IO线程内执行某个用户任务回调,即EventLoop::runInLoop(const
Functor&
cb),其中Functor是boost::function<void()>。如果用户在当前IO线程调用这个函数,回调会同步进行;如果用户在其他线程调用runInLoop(),cb会被加入队列,IO线程会被唤醒来调用这个Functor。
1
2
3
4
5
6
7
void EventLoop::runInLoop (const Functor& cb) if (isInLoopThread ()) {cb ();else {queueInLoop (cb);
有了这个功能,我们就能轻易地在线程间调配任务,比如说把TimerQueue的成员函数调用移到其IO线程,这样可以在不用锁的情况下保证线程安全性。
由于IO线程平时阻塞在事件循环EventLoop::loop()的poll()调用中,为了让IO线程能立刻执行用户回调,我们需要设法唤醒它。传统的办法是用pipe(2),IO线程始终监视此管道的可读事件,在需要唤醒的时候,其他线程往管道里写一个字节,这样IO线程就从IO
multiplexing阻塞调用中返回。(原理类似HTTP long
polling。)现在Linux有了eventfd(2),可以更高效地唤醒,因为它不必管理缓冲区。以下是EventLoop新增的成员。
1
2
3
4
5
6
7
8
9
10
11
12
13
14
15
16
17
18
19
private :void abortNotInLoopThread () void handleRead () void doPendingFunctors () typedef std::vector<Channel*> ChannelList;bool looping_; bool quit_; bool callingPendingFunctors_; const pid_t threadId_;int wakeupFd_;
wakeupChannel_用于处理wakeupFd_上的可读事件,将事件分发至handleRead()函数。其中只有pendingFunctors_暴露给了其他线程,因此用mutex保护。
queueInLoop()的实现很简单,将cb放入队列,并在必要时唤醒IO线程。
1
2
3
4
5
6
7
void EventLoop::queueInLoop (const Functor& cb) MutexLockGuard lock (mutex_) ;push_back (cb);if (!isInLoopThread () || callingPendingFunctors_) {wakeup ();
“必要时”有两种情况,
如果调用queueInLoop()的线程不是IO线程,那么唤醒是必需的;
如果在IO线程调用queueInLoop,而此时正在调用pending
functor,那也必须唤醒。
换句话说,只有在IO线程的事件回调中调用queueInLoop()才无须wakeup()。
看了下面doPendingFunctors()的调用时间点,想必读者就能明白为什么。
1
2
3
4
5
6
7
8
9
10
11
12
13
14
15
16
void EventLoop::loop () assert (!quit_);assertInLoopThread ();true ;while (!quit_) {clear ();poll (kPollTimeMs, &activeChannels_);for (ChannelList::iterator it = activeChannels_.begin ();end (); ++it) {handleEvent ();doPendingFunctors ();"EventLoop " << this << " stop looping" ;false ;
Tips:
在解释为什么“只有在IO线程的事件回调中调用queueInLoop()才无须wakeup()”之前,我们先回顾一下queueInLoop()和wakeup()函数的作用和它们在EventLoop机制中的位置。
queueInLoop()的作用
queueInLoop()函数用于将一个任务(callback)排队到EventLoop的待执行队列中。如果这个函数是在IO线程(即EventLoop所在的线程)调用的,那么它将直接将任务添加到队列中;如果从其他线程调用,它还会唤醒IO线程,以便IO线程能够处理这个新加入的任务。
wakeup()的作用
wakeup()函数用于唤醒IO线程,使其从阻塞状态(如poll()调用)返回。这通常是通过向一个特殊的文件描述符(如eventfd)写入数据来实现的,这样IO线程在检查这个文件描述符时会发现它可读,从而退出阻塞状态。
为什么在IO线程的事件回调中调用queueInLoop()无须wakeup()
避免不必要的唤醒 :当queueInLoop()在IO线程内部的事件回调中被调用时,意味着IO线程已经处于运行状态,不需要额外的唤醒操作。如果此时调用wakeup(),实际上是多余的,因为IO线程已经在处理事件回调,它自然会在回调结束后检查待执行队列。
减少上下文切换 :如果queueInLoop()在IO线程内部调用wakeup(),可能会导致不必要的上下文切换。因为wakeup()操作会将IO线程从阻塞状态唤醒,但如果queueInLoop()已经在IO线程中执行,这个唤醒操作就是不必要的,反而增加了上下文切换的开销。
避免竞态条件 :在IO线程内部调用queueInLoop()时,不需要担心其他线程同时修改待执行队列,因为所有操作都在同一个线程(IO线程)中顺序执行,不存在竞态条件。而wakeup()操作通常是在其他线程中调用的,需要确保在唤醒IO线程时,待执行队列的状态是一致的。
提高效率 :在IO线程内部调用queueInLoop()而不唤醒,可以减少唤醒操作的开销,提高整体的效率。因为唤醒操作涉及到系统调用和可能的上下文切换,这些都是相对昂贵的操作。
结论
综上所述,当queueInLoop()在IO线程的事件回调中被调用时,由于IO线程已经处于活跃状态,不需要额外的唤醒操作,因此无须调用wakeup()。这样可以避免不必要的上下文切换,减少竞态条件的风险,并提高整体的效率。
EventLoop::doPendingFunctors()不是简单地在临界区内依次调用Functor,而是把回调列表swap()到局部变量functors中,这样一方面减小了临界区的长度(意味着不会阻塞其他线程调用queueInLoop()),另一方面也避免了死锁(因为Functor可能再调用queueInLoop())。
1
2
3
4
5
6
7
8
9
10
11
12
void EventLoop::doPendingFunctors () true ;MutexLockGuard lock (mutex_) ;swap (pendingFunctors_);for (size_t i = 0 ; i < functors.size (); ++i) {false ;
由于doPendingFunctors()调用的Functor可能再调用queueInLoop(),这时queueInLoop()就必须wakeup(),否则这些新加的cb就不能被及时调用了。muduo这里没有反复执行doPendingFunctors()直到pendingFunctors_为空,这是有意的,否则IO线程有可能陷入死循环,无法处理IO事件。
EventLoop::quit()中增加几行代码,在必要时唤醒IO线程,让它及时终止循环。思考:为什么在IO线程调用quit就不必wakeup()?
1
2
3
4
5
6
void EventLoop::quit () true ;if (!isInLoopThread ()) {wakeup ();
EventLoop::wakeup()和EventLoop::handleRead()分别对wakeupFd_写入数据和读出数据,代码从略。注意muduo不是在EventLoop::handleRead()中执行doPendingFunctors(),理由见相关文档。
s03/test5.cc是单线程程序,测试了runInLoop()和queueInLoop()等新函数。
3.1 提高TimerQueue的线程安全性
前面提到TimerQueue::addTimer()只能在IO线程调用,因此EventLoop::runAfter()系列函数不是线程安全的。下面这段代码在\(\S8.2\) 中会crash,因为它在非IO线程调用了EventLoop::runAfter()。
1
2
3
4
5
6
7
8
9
10
11
12
13
14
15
muduo::EventLoop* g_loop;void print () void threadFunc () runAfter (1.0 , print);int main () muduo::Thread t (threadFunc) ;start ();loop ();
运行结果: 1 2 3 4 FATAL EventLoop::abortNotInLoopThreadEventLoop 0 x7fff892d1070 was created in threadId_=17896 ,current thread id = 17897 - EventLoop.cc:102 Aborted (core dumped)
借助EventLoop::runInLoop(),我们可以很容易地将TimerQueue::addTimer()做成线程安全的,而且无须用锁。办法是让addTimer()调用runInLoop(),把实际工作转移到IO线程来做 。先新增一个addTimerInLoop成员函数:
1 2 3 4 5 6 7 8 9 10 typedef std::pair<Timestamp, Timer*> Entry;typedef std::set<Entry> TimerList;class TimerQueue : boost::noncopyable {public :TimerQueue (EventLoop* loop);TimerQueue ();void addTimerInLoop (Timer* timer)
然后把addTimer拆成两部分,拆分后的addTimer()只负责转发,addTimerInLoop()完成修改定时器列表的工作。
1 2 3 4 5 6 7 8 9 10 11 12 13 TimerId TimerQueue::addTimer (const TimerCallback& cb, Timestamp when, double interval) {new Timer (cb, when, interval);runInLoop (boost::bind (&TimerQueue::addTimerInLoop, this , timer));return TimerId (timer);void TimerQueue::addTimerInLoop (Timer* timer) assertInLoopThread ();bool earliestChanged = insert (timer);if (earliestChanged) {resetTimerfd (timerfd_, timer->expiration ());
这样无论在哪个线程调用addTimer()都是安全的了,上一页的代码也能正常运行。
3.2 EventLoopThread class
IO线程不一定是主线程,我们可以在任何一个线程创建并运行EventLoop。 一个程序也可以有不止一个IO线程,我们可以按优先级将不同的socket分给不同的IO线程,避免优先级反转。
为了方便将来使用,我们定义EventLoopThread class,这正是one looper
thread的本意。
EventLoopThread会启动自己的线程,并在其中运行EventLoop::loop()。其中关键的startLoop()函数定义如下,这个函数会返回新线程中EventLoop对象的地址,因此用条件变量来等待线程的创建与运行。
1 2 3 4 5 6 7 8 9 EventLoop* EventLoopThread::startLoop () {assert (!thread_.started ());start ();MutexLockGuard lock (mutex_) ;while (loop_ == NULL ) {wait ();return loop_;
线程主函数在stack上定义EventLoop对象,然后将其地址赋值给loop_成员变量,最后notify()条件变量,唤醒startLoop()。
1 2 3 4 5 6 7 8 9 void EventLoopThread::threadFunc () MutexLockGuard lock (mutex_) ;notify ();loop ();
由于EventLoop的生命期与线程主函数的作用域相同,因此在threadFunc()退出之后这个指针就失效了。好在服务程序一般不要求能安全地退出,这应该不是什么大问题。
s03/test6.cc测试了EventLoopThread的功能,也测试了跨线程调用EventLoop::runInLoop()和EventLoop::runAfter()。
4. 实现TCP网络库
到目前为止,Reactor事件处理框架已初具规模,从本节开始我们用它逐步实现一个非阻塞TCP网络编程库。从poll(2)返回到再次调用poll(2)阻塞称为一次事件循环 。图8-3值得印在脑中,它有助于理解一次循环中各种回调发生的顺序。
传统的Reactor实现一般会把timers做成循环中单独的一步,而muduo把它和IO
handlers等同视之,这是使用timerfd的附带效应。将来有必要时也可以在调用IO
handlers之前或之后处理timers。
后面几节的内容安排如下:
\(\S8.4\) 介绍Acceptor
class,用于accept(2)新连接。\(\S8.5\) 介绍TcpServer,处理新建TcpConnection。\(\S8.6\) 处理TcpConnection断开连接。\(\S8.7\) 介绍Buffer
class并用它读取数据。\(\S8.8\) 介绍如何无阻塞发送数据。\(\S8.9\) 完善TcpConnection,处理SIGPIPE、TCP
keepalive等。
至此,单线程TCP服务端网络编程已经基本成型,大部分muduo示例都可以运行。
4.1 Acceptor class
先定义Acceptor
class,用于accept(2)新TCP连接,并通过回调通知使用者。它是内部class,供TcpServer使用,生命期由后者控制。Acceptor的接口如下:
1 2 3 4 5 6 7 8 9 10 11 12 13 14 15 16 17 class Acceptor : boost::noncopyable {public :typedef boost::function<void (int sockfd, const InetAddress&)> NewConnectionCallback;Acceptor (EventLoop* loop, const InetAddress& listenAddr);void setNewConnectionCallback (const NewConnectionCallback& cb) bool listening () const return listening_; }void listen () private :void handleRead () bool listening_;
Acceptor的数据成员包括Socket、Channel等。其中Socket是一个RAII
handle封装了socket文件描述符的生命期。
Acceptor的socket是listening socket,即server
socket 。Channel用于观察此socket上的readable事件,并回调Acceptor::handleRead(),后者会调用accept(2)来接受新连接,并回调用户callback。
Acceptor的构造函数和Acceptor::listen()成员函数执行创建TCP服务端的传统步骤,即调用socket(2)、bind(2)、listen(2)等Sockets
API,其中任何一个步骤出错都会造成程序终止,因此这里看不到错误处理。
1 2 3 4 5 6 7 8 9 10 11 12 13 14 15 16 Acceptor::Acceptor (EventLoop* loop, const InetAddress& listenAddr)loop_ (loop),acceptSocket_ (sockets::createNonblockingOrDie ()),acceptChannel_ (loop, acceptSocket_.fd ()),listening_ (false ),setReuseAddr (true ),bindAddress (listenAddr),setReadCallback (boost::bind (&Acceptor::handleRead, this )) {void Acceptor::listen () assertInLoopThread ();true ;listen ();enableReading ();
Acceptor的接口中用到了InetAddress class,这是对struct
sockaddr_in的简单封装,能自动转换字节序,代码从略。InetAddress具备值语义,是可以拷贝的。
Acceptor的构造函数用到createNonblockingOrDie()来创建非阻塞的socket,现在的Linux可以一步完成,代码如下。
1 2 3 4 5 6 7 8 int sockets::createNonblockingOrDie () int sockfd = ::socket (AF_INET, SOCK_STREAM | SOCK_NONBLOCK | SOCK_CLOEXEC, IPPROTO_TCP);if (sockfd < 0 ) {"sockets::createNonblockingOrDie" ;return -1 ;return sockfd;
Acceptor::listen()的最后一步让acceptChannel_在socket可读的时候调用Acceptor::handleRead(),后者会接受(accept(2))并回调newConnectionCallback_。这里直接把socket
fd传给callback,这种传递int句柄的做法不够理想,在C++11中可以先创建Socket对象,再用移动语义把Socket对象std::move()给回调函数,确保资源的安全释放。
1 2 3 4 5 6 7 8 9 10 11 12 void Acceptor::handleRead () assertInLoopThread ();int connfd = acceptSocket_.accept (&peerAddr);if (connfd >= 0 ) {if (newConnectionCallback_) {newConnectionCallback_ (connfd, peerAddr);else {close (connfd);
注意这里的实现没有考虑文件描述符耗尽的情况,muduo的处理办法见\(\S7.7\) 。还有一个改进措施,在拿到大于或等于0的connfd之后,非阻塞地poll(2)一下看看fd是否可读写。正常情况下poll(2)会返回writable,表明connfd可用。如果poll(2)返回错误,表明connfd有问题,应该立刻关闭连接。
利用Linux新增的系统调用可以直接accept(2)一步得到非阻塞的socket。
1 2 3 4 5 6 7 8 9 10 11 12 13 14 15 16 17 18 int sockets::accept (int sockfd, struct sockaddr_in* addr) socklen_t addrlen = sizeof *addr;#if VALGRIND int connfd = ::accept (sockfd, sockaddr_cast (addr), &addrlen);setNonBlockAndCloseOnExec (connfd);#else int connfd = ::accept4 (sockfd, sockaddr_cast (addr), &addrlen, SOCK_NONBLOCK | SOCK_CLOEXEC);#endif if (connfd < 0 ) {int savedErrno = errno;"Socket::accept" ;switch (savedErrno) {return connfd;
这里区分致命错误和暂时错误,并区别对待。对于暂时错误,例如EAGAIN、EINTR、EMFILE、ECONNABORTED等等,处理办法是忽略这次错误。对于致命错误,例如ENFILE、ENOMEM等等,处理办法是终止程序,对于未知错误也照此办理。
下面写个小程序来试验Acceptor的功能,它在9981端口侦听新连接,连接到达后向它发送一个字符串,随即断开连接。
1 2 3 4 5 6 7 8 9 10 11 12 13 14 15 void newConnection (int sockfd, const muduo::InetAddress& peerAddr) printf ("newConnection(): accepted a new connection from %s\n" , peerAddr.toHostPort ().c_str ());write (sockfd, "How are you?\n" , 13 );close (sockfd);int main () printf ("main(): pid=%d\n" , getpid ());muduo::InetAddress listenAddr (9981 ) ;muduo::Acceptor acceptor (&loop, listenAddr) ;setNewConnectionCallback (newConnection);listen ();loop ();
5. TcpServer接受新连接
本节会介绍TcpServer并初步实现TcpConnection,本节只处理连接的建立,下一节处理连接的断开,再往后依次处理读取数据和发送数据。
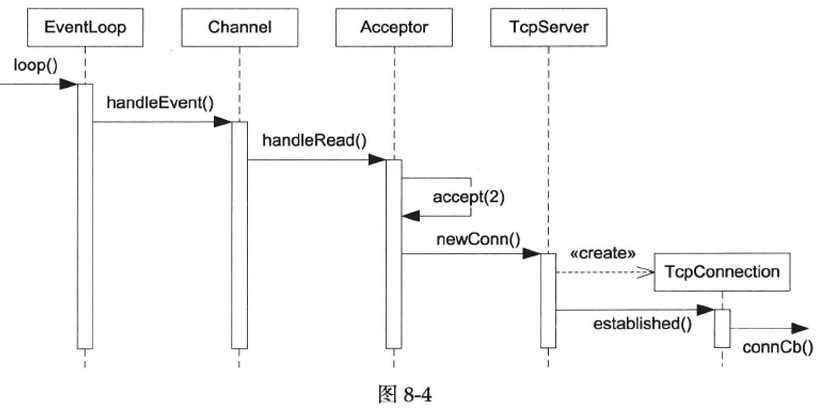
TcpServer新建连接的相关函数调用顺序见图8-4(有的函数名是简写,省略了poll(2)调用)。其中Channel::handleEvent()的触发条件是listening
socket可读,表明有新连接到达。TcpServer会为新连接创建对应的TcpConnection对象。
5.1 TcpServer class
TcpServer
class的功能是管理accept(2)获得的TcpConnection。TcpServer是供用户直接使用的,生命期由用户控制。TcpServer的接口如下,用户只需要设置好callback,再调用start()即可。
1 2 3 4 5 6 7 8 9 10 11 12 13 14 15 16 17 18 19 20 21 22 23 24 25 26 27 28 29 30 31 32 33 34 35 36 37 class TcpServer : boost::noncopyable {public :TcpServer (EventLoop* loop, const InetAddress& listenAddr);TcpServer (); void start () void start () void setConnectionCallback (const ConnectionCallback& cb) void setMessageCallback (const MessageCallback& cb) private :void newConnection (int sockfd, const InetAddress& peerAddr) typedef std::map<std::string, TcpConnectionPtr> ConnectionMap;const std::string name_;bool started_;int nextConnId_;
TcpServer内部使用Acceptor来获得新连接的fd。它保存用户提供的Connection-Callback和MessageCallback,在新建TcpConnection的时候会原样传给后者。TcpServer持有目前存活的TcpConnection的shared_ptr(定义为TcpConnectionPtr),因为TcpConnection对象的生命期是模糊的,用户也可以持有TcpConnectionPtr.
每个TcpConnection对象有一个名字,这个名字是由其所属的TcpServer在创建TcpConnection对象时生成,名字是ConnectionMap的key。
在新连接到达时,Acceptor会回调newConnection(),
后者会创建TcpConnection对象conn,把它加入ConnectionMap,设置好callback,
再调用conn->connectEstablished(),其中会回调用户提供的ConnectionCallback。代码如下。
1 2 3 4 5 6 7 8 9 10 11 12 13 14 void TcpServer::newConnection (int sockfd, const InetAddress& peerAddr) assertInLoopThread ();char buf[32 ];snprintf (buf, sizeof buf, "#%d" , nextConnId_);"TcpServer::newConnection[" << name_ << "] - new connection [" << connName << "] from " << peerAddr.toHostPort ();InetAddress localAddr (sockets::getLocalAddr(sockfd)) ;TcpConnectionPtr conn (new TcpConnection(loop_, connName, sockfd, localAddr, peerAddr)) ;setConnectionCallback (connectionCallback_);setMessageCallback (messageCallback_);connectEstablished ();
注意muduo尽量让依赖是单向的,TcpServer会用到Acceptor,但Acceptor并不知道TcpServer的存在。TcpServer会创建TcpConnection,但TcpConnection并不知道TcpServer的存在。另外可以考虑改用make_shared()以节约一次new。
5.2 TcpConnection class
TcpConnection
class可谓是muduo最核心也是最复杂的class,它的头文件和源文件一共有450多行,是muduo最大的class。本章会用5节的篇幅来逐渐完善它。
TcpConnection是muduo里唯一默认使用shared_ptr来管理的class,也是唯一继承enable_shared_from_this的class,这源于其模糊的生命期 ,原因见\(\S4.7\) 。
本节的TcpConnection没有可供用户使用的函数,因此接口从略,以下是其数据成员。
目前TcpConnection的状态只有两个,kConnecting和kConnected,
TcpConnection使用Channel来获得socket上的IO事件,它会自己处理writable事件,而把readable事件通过MessageCallback传达给客户。
TcpConnection拥有TCP
socket,它的析构函数会close(fd)(在Socket的析构函数中发生)。
1 2 3 4 5 6 7 8 9 10 11 12 13 14 15 16 17 18 19 20 21 22 class TcpConnection : boost::noncopyable, public boost::enable_shared_from_this<TcpConnection> {public :private :enum StateE { kConnecting, kConnected, };void setState (StateE s) void handleRead ()
注意TcpConnection表示的是“一次TCP连接”,它是不可再生的,一旦连接断开,这个TcpConnection对象就没啥用了。另外TcpConnection没有发起连接的功能,其构造函数的参数是已经建立好连接的socketfd(无论是TcpServer被动接受还是TcpClient主动发起),因此其初始状态是kConnecting。
本节的MessageCallback定义很原始,没有使用Buffer
class,而只是把(const char* buf,int
len)传给用户,这种接口用起来无疑是很不方便的。
1 2 3 4 5 6 void TcpConnection::handleRead () char buf[65536 ];ssize_t n = ::read (channel_->fd (), buf, sizeof buf);messageCallback_ (shared_from_this (), buf, n);
本节的TcpConnection只处理了建立连接,没有处理断开连接(例如handleRead()中的read(2)返回0),接收数据的功能很简陋,也不支持发送数据,这些都将逐步得到完善。
s05/test8.cc试验了目前实现的功能,它实际上是个discard服务。但目前它永远不会关闭socket,即永远不会走到else分支,在遇到对方断开连接的时候会陷入busy
loop。\(\S8.6\) 会处理连接的断开。
1 2 3 4 5 6 7 8 9 10 11 12 13 14 15 16 17 18 19 20 21 22 23 24 25 26 27 void onConnection (const muduo::TcpConnectionPtr& conn) if (conn->connected ()) {printf ("onConnection(): new connection [%s] from %s\n" , name ().c_str (), peerAddress ().toHostPort ().c_str ());else {printf ("onConnection(): connection [%s] is down\n" , name ().c_str ());void onMessage (const muduo::TcpConnectionPtr& conn, const char * data, ssize_t len) printf ("onMessage(): received %zd bytes from connection [%s]\n" , name ().c_str ());int main () printf ("main(): pid=%d\n" , getpid ());muduo::InetAddress listenAddr (9981 ) ;muduo::TcpServer server (&loop, listenAddr) ;setConnectionCallback (onConnection);setMessageCallback (onMessage);start ();loop ();
6. TcpConnection断开连接
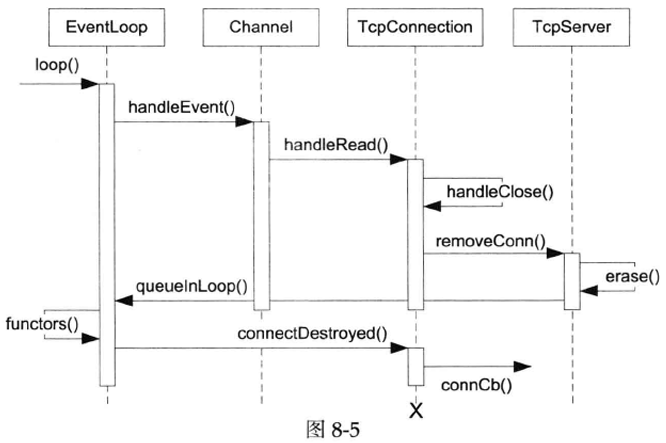
muduo只有一种关闭连接的方式:被动关闭(p.191)。即对方先关闭连接,本地read(2)返回0,触发关闭逻辑。将来如果有必要也可以给TcpConnection新增forceclose()成员函数,用于主动关闭连接,实现很简单,调用handleclose()即可。处理调用的流程见图8-5,其中的“x”表示TcpConnection通常会在此时析构。
一般来讲数据的删除比新建要复杂,TCP连接也不例外。关闭连接的流程看上去有点“绕”,根本原因是p.274讲的对象生命期管理的需要。
6.1 Channel的改动
Channel
class新增了closeCallback事件回调,并且断言(assert())在事件处理期间本Channel对象不会析构 ,即不会发生p.274讲的出错情况。
1 2 3 4 5 6 7 8 9 10 11 12 13 14 15 16 17 18 19 20 21 22 23 24 25 26 27 28 29 30 31 32 class Channel : boost::noncopyable {public :typedef boost::function<void ()> EventCallback;typedef boost::function<void (Timestamp)> ReadEventCallback;Channel (EventLoop* loop, int fd);Channel ();void handleEvent (Timestamp receiveTime) void setReadCallback (const ReadEventCallback& cb) void setWriteCallback (const EventCallback& cb) void setCloseCallback (const EventCallback& cb) void setErrorCallback (const EventCallback& cb) int fd () const return fd_; }void enableReading () update (); }void enableWriting () update (); }void disableWriting () update (); }void disableAll () update (); }bool isWriting () const return events_ & kWriteEvent; }private :void update () static const int kNoneEvent;static const int kReadEvent;static const int kWriteEvent;const int fd_;int events_;int revents_;int index_;
TcpConnection的改动
TcpConnection
class也新增了closeCallback事件回调,但是这个回调是给TcpServer和TcpClient用的,用于通知它们移除所持有的TcpConnectionPtr,这不是给普通用户用的,普通用户继续使用ConnectionCallback。
1 2 3 4 5 6 7 8 9 10 11 12 13 14 15 16 17 18 19 20 21 22 23 24 25 26 class TcpConnection : boost::noncopyable,public boost::enable_shared_from_this<TcpConnection> {public :private :enum StateE { kConnecting, kConnected, kDisconnecting, kDisconnected };void setState (StateE s) void handleRead (Timestamp receiveTime) void handleWrite () void handleClose () void handleError () void sendInLoop (const std::string& message) void shutdownInLoop ()
TcpConnection把另外几个handle*()事件处理函数也补上了,handleWrite()暂时为空。Channel的closeCallback会调用TcpConnection::handleClose(),依此类推。
1 2 3 4 5 6 7 8 9 10 11 12 13 14 15 16 17 18 19 20 21 22 23 24 25 26 27 void TcpConnection::handleRead (Timestamp receiveTime) char buf[65536 ];ssize_t n = inputBuffer_.readFd (channel_->fd (), &savedErrno);if (n > 0 ) {messageCallback_ (shared_from_this (), &inputBuffer_, receiveTime);else if (n == 0 ) {handleClose ();else {"TcpConnection::handleRead" ;handleError ();void TcpConnection::handleClose () assertInLoopThread ();"TcpConnection::handleClose state=" << state_;assert (state_ == kConnected);disableAll ();closeCallback_ (shared_from_this ());void TcpConnection::handleError () int err = sockets::getSocketError (channel_->fd ());"TcpConnection::handleError [" << name_ << "] - SO_ERROR = " << err << " " << strerror (err);
TcpConnection::connectDestroyed()是TcpConnection析构前最后调用的一个成员函数,它通知用户连接已断开。其中的channel_->disableAll();与上面的channel_->disableAll();重复,这是因为在某些情况下可以不经由handleClose()面直接调用connectDestroyed。
1 2 3 4 5 6 7 8 void TcpConnection::connectDestroyed () assertInLoopThread ();assert (state_ == kConnected);setState (kDisconnected);disableAll ();connectionCallback_ (shared_from_this ());removeChannel (get_pointer (channel_));
6.2 TcpServer的改动
TcpServer向TcpConnection注册closeCallback,用于接收连接断开的消息。
1 2 3 4 5 6 7 8 9 10 11 12 13 14 15 16 17 18 19 20 21 22 23 void TcpServer::newConnection (int sockfd, const InetAddress& peerAddr) assertInLoopThread ();char buf[32 ];snprintf (buf, sizeof buf, "#%d" , nextConnId_);"TcpServer::newConnection [" << name_ << "] - new connection [" << connName << "] from " << peerAddr.toHostPort ();InetAddress localAddr (sockets::getLocalAddr(sockfd)) ;TcpConnectionPtr conn (new TcpConnection(loop_, connName, sockfd, localAddr, peerAddr)) ;setConnectionCallback (connectionCallback_);setMessageCallback (messageCallback_);setCloseCallback (boost::bind (&TcpServer::removeConnection, this , _1));connectEstablished ();void TcpServer::removeConnection (const TcpConnectionPtr& conn) assertInLoopThread ();"TcpServer::removeConnection [" << name_ << "] - connection " << conn->name ();size_t n = connections_.erase (conn->name ());assert (n == 1 ); (void )n;queueInLoop (boost::bind (&TcpConnection::connectDestroyed, conn));
通常TcpServer的生命期长于它建立的TcpConnection,因此不用担心TcpServer对象失效。在muduo中,TcpServer的析构函数会关闭连接,因此也是安全的。
TcpServer:removeConnection()把conn从ConnectionMap中移除。这时Tcp-Connection已经是命悬一线:如果用户不持有TcpConnectionPtr的话,conn的引用计数已降到1。注意这里一定要用EventLoop:queueInLoop(),否则就会出现p.274讲的对象生命期管理问题。另外注意这里用boost::bind让TcpConnection的生命期长到调用connectDestroyed()的时刻 。
有兴趣的读者可以单步跟踪连接断开的流程,s06/test8.cc不会陷入busyloop。目前的做法不是最简洁的,但是可以几乎原封不动地用到多线程TcpServer中(\(\S8.10\) )。
6.3 EventLoop和Poller的改动
本节TcpConnection不再是只生不灭,因此要求EventLoop也提供unregister功能 。EventLoop新增了removeChannel()成员函数,它会调用Poller::removeChannel,后者定义如下,复杂度为O(logN)。
1 2 3 4 5 6 7 8 9 10 11 12 13 14 15 16 17 18 19 20 21 22 23 24 void Poller::removeChannel (Channel* channel) assertInLoopThread ();"fd=" << channel->fd ();assert (channels_.find (channel->fd ()) != channels_.end ());assert (channels_[channel->fd ()] == channel);assert (channel->isNoneEvent ());int idx = channel->index ();assert (0 <= idx && idx < static_cast <int >(pollfds_.size ()));const struct pollfd & pfd = pollfds_[idx]; (void )pfd;assert (pfd.fd == -channel->fd () - 1 && pfd.events == channel->events ());size_t n = channels_.erase (channel->fd ());assert (n == 1 ); (void )n;if (implicit_cast <size_t >(idx) == pollfds_.size () - 1 ) {pop_back ();else {int channelAtEnd = pollfds_.back ().fd;iter_swap (pollfds_.begin () + idx, pollfds_.end () - 1 );if (channelAtEnd >= 0 ) {1 ;set_index (idx);pop_back ();
注意其中从数组pollfds_中删除元素是O(1)复杂度,办法是将待删除的元素与最后一个元素交换,再pollfds_.pop_back()。这需要相应地修改p.286的代码:
1 2 3 4 5 6 7 8 9 10 11 12 13 14 15 16 17 18 19 20 21 22 23 24 25 26 void Poller::updateChannel (Channel* channel) assertInLoopThread ();"fd=" << channel->fd ();assert (channels_.find (channel->fd ()) != channels_.end ());assert (channels_[channel->fd ()] == channel);int idx = channel->index ();assert (0 <= idx && idx < static_cast <int >(pollfds_.size ()));struct pollfd & pfd = pollfds_[idx];assert (pfd.fd == -channel->fd () - 1 && pfd.events == channel->events ());static_cast <short >(channel->events ());0 ;if (channel->isNoneEvent ()) {fd () - 1 ;assert (channels_[channel->fd ()] == channel);int idx = channel->index ();assert (0 <= idx && idx < static_cast <int >(pollfds_.size ()));struct pollfd & pfd = pollfds_[idx];assert (pfd.fd == -channel->fd () - 1 && pfd.events == channel->events ());static_cast <short >(channel->events ());0 ;if (channel->isNoneEvent ()) {fd () - 1 ;
7. Buffer读取数据
Buffer是非阻塞TCP网络编程必不可少的东西 (\(\S7.4\) ),本节介绍用Buffer来处理数据输入,下一节介绍数据输出。Buffer是另一个具有值语义的对象。
首先修改s07/Callbacks.h中MessageCallback的定义,现在的参数和muduo一样,是Buffer*和Timestamp,不再是原始的(const
char* buf,int len)。
1 2 3 typedef boost::function<void (const TcpConnectionPtr&,
其中Timestamp是poll(2)返回的时刻,即消息到达的时刻,这个时刻早于读到数据的时刻(read(2)调用或返回)。因此如果要比较准确地测量程序处理消息的内部延迟,应该以此时刻为起点,否则测出来的结果偏小,特别是处理并发连接时效果更明显。(为什么?)为此我们需要修改Channel中ReadEventCallback的原型,改动如下。EventLoop::loop()也需要有相应的改动,此处从略。
1 2 3 4 5 6 7 8 9 class Channel : boost::noncopyable {public :typedef boost::function<void ()> EventCallback;typedef boost::function<void (Timestamp)> ReadEventCallback;Channel (EventLoop* loop, int fd);Channel ();void handleEvent (Timestamp receiveTime) void setReadCallback (const ReadEventCallback& cb)
s07/test3.cc试验了以上改动:
1 2 3 4 5 6 7 8 9 10 11 void timeout (muduo::Timestamp receiveTime) printf ("%s Timeout!\n" , receiveTime.toFormattedString ().c_str ());quit ();int main () printf ("%s started\n" , muduo::Timestamp::now ().toFormattedString ().c_str ());
7.1
TcpConnection使用Buffer作为输入缓冲
先给TcpConnection添加inputBuffer_成员变量。
1 2 3 4 ConnectionCallback connectionCallback_;
然后修改TcpConnection::handleRead()成员函数,使用Buffer来读取数据。
1 2 3 4 5 6 7 8 9 10 11 12 13 void TcpConnection::handleRead (Timestamp receiveTime) int savedErrno = 0 ;ssize_t n = inputBuffer_.readFd (channel_->fd, &savedErrno);if (n > 0 ) {messageCallback_ (shared_from_this (), &inputBuffer_, receiveTime);else if (n == 0 ) {handleClose ();else {"TcpConnection::handleRead" ;handleError ();
修改s07/test8.cc以试验本次改动后的新功能。
1 2 3 4 5 6 7 void onMessage (const muduo::TcpConnectionPtr& conn, muduo::Buffer* buf, muduo::Timestamp receiveTime) printf ("onMessage(): received %zd bytes from connection [%s] at %s\n" ,name ().c_str (),toFormattedString ().c_str ());printf ("onMessage():[%s]\n" , buf->retrieveAsString ().c_str ());
这个测试程序看上去和muduo的正式用法没有区别。
7.2 Buffer::readFd()
我在p.208提到Buffer读取数据时兼顾了内存使用量和效率,其实现如下。
1 2 3 4 5 6 7 8 9 10 11 12 13 14 15 16 17 18 19 ssize_t Buffer::readFd (int fd, int * savedErrno) char extrabuf[65536 ];struct iovec vec[2 ];const size_t writable = writableBytes ();0 ].iov_base = begin () + writerIndex_;0 ].iov_len = writable;1 ].iov_base = extrabuf;1 ].iov_len = sizeof extrabuf;const ssize_t n = readv (fd, vec, 2 );if (n < 0 ) {else if (implicit_cast <size_t >(n) <= writable) {else {append (extrabuf, n - writable);return n;
这个实现有几点值得一提。
一是使用了scatter/gather
IO,并且一部分缓冲区取自stack,这样输入缓冲区足够大,通常一次readv(2)调用就能取完全部数据。由于输入缓冲区足够大,也节省了一次ioctl(socketFd,FIONREAD,&length)系统调用,不必事先知道有多少数据可读而提前预留(reserve())Buffer的capacity(),可以在一次读取之后将extrabuf中的数据append()给Buffer。
二是Buffer::readFd()只调用一次read(2),而没有反复调用read(2)直到其返回EAGAIN。
首先,这么做是正确的,因为muduo采用level
trigger,这么做不会丢失数据或消息。
其次,对追求低延迟的程序来说,这么做是高效的,因为每次读数据只需要一次系统调用。
再次,这样做照顾了多个连接的公平性,不会因为某个连接上数据量过大而影响其他连接处理消息。
假如muduo采用edge
trigger,那么每次handleRead()至少调用两次read(2),平均起来比level
trigger多一次系统调用,edge trigger不见得更高效。
将来的一个改进措施是:如果n = writable + sizeof
extrabuf,就再读一次。
在一个不繁忙(没有出现消息堆积)的系统上,程序一般等待在poll(2)上,一有数据到达就会立刻唤醒应用程序来读取,那么每次read的数据不会超过几KiB(一两个以太网frame),这里64KiB缓冲足够容纳千兆网在500us内全速收到的数据,在一定意义下可视为延迟带宽积(bandwidth-delay
product)。
8.
TcpConnection发送数据 发送数据比接收数据更难,因为发送数据是主动的,接收读取数据是被动的。这也是本章先介绍TcpServer后介绍TcpClient的原因。到目前为止,我们只用到了Channel的ReadCallback:
TimerQueue用它来读timerfd(2);
EventLoop用它来读eventfd(2);
TcpServer/Acceptor用它来读listening socket;
TcpConnection用它来读普通TCP socket。
本节会动用其writeCallback,由于muduo采用level
trigger,因此我们只在需要时才关注writable事件,否则就会造成busy
loop。s08/Channel.h的改动如下:
1 2 3 4 5 void enableReading () update (); }void enableWriting () update (); }void disableWriting () update (); }void disableAll () update (); }bool isWriting () const return events_ & kWriteEvent; }
TcpConnection的接口中增加了send()和shutdown两个函数,这两个函数都可以跨线程调用。为了简单起见,本章只提供一种send()重载。
1 2 3 4 5 +void send (const std::string& message) void shutdown ()
TcpConnection的状态增加到了4个,和目前muduo的实现一致。
1 enum StateE { kConnecting, kConnected, kDisconnecting, kDisconnected, };
其内部实现增加了两个InLoop成员函数,对应前面的两个新接口函数,并使用Buffer作为输出缓冲区。
1 2 3 4 5 6 void handleClose () void handleError () void sendInLoop (const std::string& message) void shutdownInLoop ()
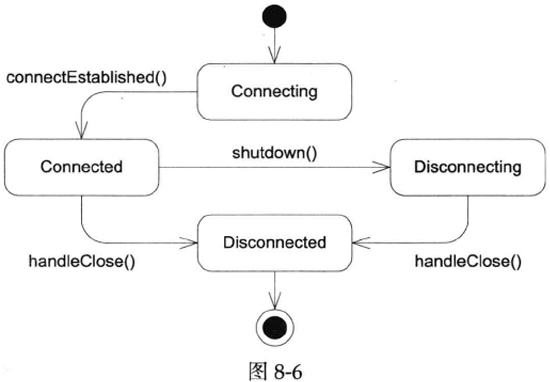
TcpConnection有一个非常简单的状态图(见图8-6)。
TcpConnection在关闭连接的过程中与其他操作(读写事件)的交互比较复杂,尚需完备的单元测试来验证各种时序下的正确性。必要时可能要新增状态。
shutdown()是线程安全的,它会把实际工作放到shutdownInLoop()中来做,后者保证在IO线程调用。如果当前没有正在写入,则关闭写入端(P.191)。代码注释给出了两个值得改进的地方。
1 2 3 4 5 6 7 8 9 10 11 12 13 14 void TcpConnection::shutdown () if (state_ == kConnected) {setState (kDisconnecting);runInLoop (boost::bind (&TcpConnection::shutdownInLoop, this ));void TcpConnection::shutdownInLoop () assertInLoopThread ();if (!channel_->isWriting ())shutdownWrite ();
由于新增了kDisconnecting状态,TcpConnection::connectDestroyed()和TcpConnection::handleClose()中的assert也需要相应的修改,代码从略。
send()也是一样的,如果在非IO线程调用,它会把message复制一份,传给IO线程中的sendInLoop()来发送。这么做或许有轻微的效率损失,但是线程安全性很容易验证,我认为还是利大于弊。如果真的在乎这点性能,不如让程序只在IO线程调用send()。另外在C++11中可以使用移动语义,避免内存拷贝的开销。
1 2 3 4 5 6 7 8 9 10 11 12 13 14 15 16 17 18 19 20 21 22 23 24 25 26 27 28 29 30 31 32 33 34 35 void TcpConnection::send (const std::string& message) if (state_ == kConnected) {if (loop_->isInLoopThread ())sendInLoop (message);else runInLoop (bind (&TcpConnection::sendInLoop, this , message));void TcpConnection::sendInLoop (const std::string& message) assertInLoopThread ();ssize_t nwrote = 0 ;if (!channel_->isWriting () && outputBuffer_.readableBytes () == 0 ) {write (channel_->fd (), message.data (), message.size ());if (nwrote >= 0 ) {if (implicit_cast <size_t >(nwrote) < message.size ()) {"I am going to write more data" ;else {0 ;if (errno != EWOULDBLOCK) {}"TcpConnection::sendInLoop" ;assert (nwrote >= 0 );if (implicit_cast <size_t >(nwrote) < message.size ()) {append (message.data () + nwrote, message.size () - nwrote);if (!channel_->isWriting ()) {enableWriting ();
sendInLoop()会先尝试直接发送数据,如果一次发送完毕就不会启用WriteCallback;如果只发送了部分数据,则把剩余的数据放入outputBuffer_,并开始关注writable事件,以后在handlerWrite()中发送剩余的数据。如果当前outputBuffer_已经有待发送的数据,那么就不能先尝试发送了,因为这会造成数据乱序。
当socket变得可写时,Channel会调用TcpConnection::handleWrite(),这里我们继续发送outputBuffer_中的数据。一旦发送完毕,立刻停止观察writable事件,避免busy
loop。另外如果这时连接正在关闭,则调用shutdownInLoop,继续执行关闭过程。这里不需要处理错误,因为一旦发生错误,handleRead()会读到0字节,继而关闭连接。
1 2 3 4 5 6 7 8 9 10 11 12 13 14 15 16 17 18 19 void TcpConnection::handleWrite () assertInLoopThread ();if (channel_->isWriting ()) {ssize_t n = ::write (channel_->fd (), outputBuffer_.peek (), readableBytes ());if (n > 0 ) {retrieve (n);if (outputBuffer_.readableBytes () == 0 ) {disableWriting ();else {"I am going to write more data" ;else {"TcpConnection::handleWrite" ;else {"Connection is down, no more writing" ;
注意sendInLoop()和handleWrite()都只调用了一次write(2)而不会反复调用直至它返回EAGAIN,原因是如果第一次write(2)没有能够发送完全部数据的话,第二次调用write(2)几乎肯定会返回EAGAIN。读者可以很容易用下面的Python代码来验证这一点。因此muduo决定节省一次系统调用,这么做不影响程序的正确性,却能降低延迟。
1 2 3 4 5 6 7 8 9 10 11 12 13 14 15 16 17 import socket, sys9876 )) 0 )'a' * int (sys.argv[1 ])b'*' * int (sys.argv[2 ])0 try :except socket.error as ex:print (ex) print (n1)print (n2)
一个改进措施:TcpConnection的输出缓冲区不必是连续的(outputBuffer_改成ptr_vector<Buffer>),handleWrite()可以用writev(2)来发送多块数据,这样或许能减小内存拷贝的次数,略微提高性能(但这种性能提高不一定能被外界感知)。
在level
trigger模式中,数据的发送比较麻烦,因为不能一直关注writable事件,不过数据的读取很简单。我认为理想的做法是对readable事件采用level
trigger,对writable事件采用edge
trigger,但是目前Linux不支持这种设定。
s08/test9.cc是echo
server(S6.4.2),代码从略。s08/test10.cc试验TcpConnection::send()的功能,它和前面的Python示例相近,都是通过命令行指定两条消息的大小,然后连续发送两条消息。通过选择不同的消息长度,可以试验不同的code
path。
1 2 3 4 5 6 7 8 9 10 11 12 13 void onConnection (const muduo::TcpConnectionPtr& conn) if (conn->connected ()) {printf ("onConnection(): new connection [%s] from %s\n" , name ().c_str (), peerAddress ().toHostPort ().c_str ());send (message1);shutdown ();send (message2);else {printf ("onConnection(): connection [%s] is down\n" , name ().c_str ());
9. 完善TcpConnection
至此TcpConnection的主体功能接近完备,可以应付大部分muduo示例的需求了。本节补充几个小功能,让它成为可以实用的单线程非阻塞TCP网络库。
9.1 SIGPIPE SIGPIPE的默认行为是终止进程 ,在命令行程序中这是合理的,在网络编程中,这意味着如果对方断开连接而本地继续写入的话,会造成服务进程意外退出。假如服务进程繁忙,没有及时处理对方断开连接的事件,就有可能出现在连接断开之后继续发送数据的情况。下面这个例子模拟了这种情况:
1 2 3 4 5 6 7 8 9 10 11 12 13 void onConnection (const muduo::TcpConnectionPtr& conn) if (conn->connected ()) {printf ("onConnection(): new connection [%s] from %s\n" ,name ().c_str (),peerAddress ().toHostPort ().c_str ());if (sleepSeconds > 0 ) {sleep (sleepSeconds);send (message1);send (message2);shutdown ();
假设sleepSeconds是5秒,用nc localhost 9981创建连接之后立刻Ctrl-C断开客户端,服务进程过几秒就会退出。解决办法很简单,在程序开始的时候就忽略SIGPIPE,可以用C++全局对象做到这一点。
1 2 3 4 5 6 7 8 class IgnoreSigPipe {public :IgnoreSigPipe () {signal (SIGPIPE, SIG_IGN);
9.2 TCPNoDelay和TCPkeepalive
TCPNoDelay和TCPkeepalive都是常用的TCP选项,
前者的作用是禁用Nagle算法,避免连续发包出现延退,这对编写低延迟网络服务很重要。
后者的作用是定期探查TCP连接是否还存在。一般来说如果有应用层心跳的话,TCPkeepalive不是必需的,但是一个通用的网络库应该暴露其接口。
以下是TcpConnection::setTcpNoDelay()的实现,涉及3个文件。
1 void setTcpNoDelay (bool on)
1 2 3 void TcpConnection::setTcpNoDelay (bool on) setTcpNoDelay (on);
1 2 3 4 5 void Socket::setTcpNoDelay (bool on) int optval = on ? 1 : 0 ;setsockopt (sockfd_, IPPROTO_TCP, sizeof optval);
TcpConnection::setKeepAlive()的实现与之类似,此处从略,可参考muduo源码。
9.3
WriteCompleteCallback和HighWaterMarkCallback 非阻塞网络编程的发送数据比读取数据要困难得多:
一方面是\(\S8.8\) 提到的“什么时候关注writable事件”的问题,这只带来编码方面的难度;
另一方面是如果发送数据的速度高于对方接收数据的速度,会造成数据在本地内存中堆积,这带来设计及安全性方面的难度。
muduo对此的解决办法是提供两个回调,有的网络库把它们称为“高水位回调”和“低水位回调”,muduo使用HighWaterMarkCallback和WriteCompleteCallback这两个名字。WriteCompleteCallback很容易理解,如果发送缓冲区被清空,就调用它 。TcpConnection有两处可能触发此回调:
1 2 3 4 5 6 7 8 9 10 11 12 13 14 15 16 17 18 19 20 21 22 23 24 25 26 27 28 29 30 31 32 33 34 35 36 37 38 39 40 41 42 43 void TcpConnection::sendInLoop (const std::string& message) assertInLoopThread ();ssize_t nwrote = 0 ;if (!channel_->isWriting () && outputBuffer_.readableBytes () == 0 ) {write (channel_->fd (), message.data (), message.size ());if (nwrote >= 0 ) {if (implicit_cast <size_t >(nwrote) < message.size ()) {"I am going to write more data" ;else if (writeCompleteCallback_) {queueInLoop (bind (writeCompleteCallback_, shared_from_this ()));else {0 ;void TcpConnection::handleWrite () assertInLoopThread ();if (channel_->isWriting ()) {ssize_t n = ::write (channel_->fd (), peek (),readableBytes ());if (n > 0 ) {retrieve (n);if (outputBuffer_.readableBytes () == 0 ) {disableWriting ();if (writeCompleteCallback_) {queueInLoop (bind (writeCompleteCallback_, shared_from_this ()));if (state_ == kDisconnecting) {shutdownInLoop ();else {"TcpConnection::handleWrite" ;else if (callingExpiredTimers_) {insert (timer);
TcpConnection和TcpServer也需要相应地暴露WriteCompleteCallback的接口 ,代码从略。
s09/test11.cc是chargen服务(\(\S7.1\) ),用到了writeCompleteCallback,代码从略。
另外一个有用的callback是HighWaterMarkCallback,如果输出缓冲的长度超过用户指定的大小,就会触发回调(只在上升沿触发一次) 。代码见muduo,此处从略。
如果用非阻塞的方式写一个proxy,proxy有C和S两个连接(\(\S7.13\) )。只考虑server发给client的数据流(反过来也是一样),为了防止server发过来的数据撑爆C的输出缓冲区,一种做法是在C的HighWaterMarkCallback中停止读取S的数据,而在C的WriteCompleteCallback中恢复读取S的数据。这就跟用粗水管往水桶里灌水,用细水管从水桶中取水一个道理,上下两个水龙头要轮流开合,类似PWM。
10. 多线程TcpServer
本章的最后几节介绍三个主题:多线程TcpServer、TcpClient、epoll(4),主题之间相互独立。
本节介绍多线程TcpServer,用到了EventLoopThreadPool class。
10.1 EventLoopThreadPool
用one loop per
thread的思想实现多线程TcpServer的关键步骤是在新建TcpConnection时从event
loop
pool里挑选一个loop给TcpConnection用。也就是说多线程TcpServer自己的EventLoop只用来接受新连接,而新连接会用其他EventLoop来执行IO。(单线程TcpServer的EventLoop是与TcpConnection共享的。)muduo的event
loop pool由EventLoopThreadPool class表示,接口如下:
1 2 3 4 5 6 7 8 9 10 11 12 13 14 15 16 class EventLoopThreadPool : boost::noncopyable {public :EventLoopThreadPool (EventLoop* baseLoop);EventLoopThreadPool ();void setThreadNum (int numThreads) void start () EventLoop* getNextLoop () ;private :bool started_;int numThreads_;int next_;
TcpServer每次新建一个TcpConnection就会调用getNextLoop()来取得EventLoop,如果是单线程服务,每次返回的都是baseLoop,即TcpServer自己用的那个loop。其中setThreadNum()的参数的意义见TcpServer代码注释。
1 2 3 4 5 6 7 8 9 10 11 12 13 14 15 16 class TcpServer : boost::noncopyable {public :TcpServer (EventLoop* loop, const InetAddress& listenAddr);TcpServer (); void setThreadNum (int numThreads) private :void newConnection (int sockfd, const InetAddress& peerAddr) void removeConnection (const TcpConnectionPtr& conn) void removeConnectionInLoop (const TcpConnectionPtr& conn) typedef std::map<std::string, TcpConnectionPtr> ConnectionMap;const std::string name_;
多线程TcpServer的改动很简单,新建连接只改了3行代码。原来是把TcpServer自用的loop_传给TcpConnection,现在是每次从EventLoopThreadPool取得ioLoop。
1 2 3 4 5 6 7 8 9 10 11 void TcpServer::newConnection (int sockfd, const InetAddress& peerAddr) InetAddress localAddr (sockets::getLocalAddr(sockfd)) ;getNextLoop ();TcpConnectionPtr conn (new TcpConnection(ioLoop, connName, sockfd, localAddr, peerAddr)) ;setConnectionCallback (connectionCallback_);setMessageCallback (messageCallback_);setWriteCompleteCallback (writeCompleteCallback_);setCloseCallback (boost::bind (&TcpServer::removeConnection, this , -1 )); runInLoop (boost::bind (&TcpConnection::connectEstablished, conn));
连接的销毁也不复杂,把原来的removeConnection()拆为两个函数,因为TcpConnection会在自己的ioLoop线程调用removeConnection(),所以需要把它移到TcpServer的loop_线程(因为TcpServer是无锁的)。再次把connectDestroyed()移到TcpConnection的ioLoop线程进行,是为了保证TcpConnection的ConnectionCallback始终在其ioLoop回调,方便客户端代码的编写。
1 2 3 4 5 6 7 8 9 10 11 12 13 14 void TcpServer::removeConnection (const TcpConnectionPtr& conn) runInLoop (bind (&TcpServer::removeConnectionInLoop, this , conn));void TcpServer::removeConnectionInLoop (const TcpConnectionPtr& conn) assertInLoopThread ();"TcpServer::removeConnectionInLoop [" << name "] - connection " << conn->name ();size_t n = connections_.erase (conn->name ());assert (n == 1 ); (void )n;getLoop ();queueInLoop (boost::bind (&TcpConnection::connectDestroyed, conn));
总而言之,TcpServer和TcpConnection的代码都只处理单线程的情况(甚至都没有mutex成员),而我们借助EventLoop::runInLoop并引入EventLoopThreadPool让多线程TcpServer的实现易如反掌。注意ioLoop和loop_间的线程切换都发生在连接建立和断开的时刻,不影响正常业务的性能。
muduo目前采用最简单的round-robin算法来选取pool中的EventLoop ,不允许TcpConnection在运行中更换EventLoop,这对长连接和短连接服务都是适用的,不易造成偏载。muduo目前的设计是每个TcpServer有自己的EventLoopThreadPool,多个TcpServer之间不共享EventLoopThreadPool。将来如果有必要,也可以多个TcpServer共享EventLoopThreadPool,比方说一个服务有多个等价的TCP端口,每个TcpServer负责一个端口,而来自这些端口的连接共享一个EventLoopThreadPool。另外一种可能的用法是一个EventLoop供两个TcpServer使用(a和b)。其中a是单线程服务,aLoop既要accept(2)连接也要执行IO;而b是多线程服务,有自己的EventLoopThreadPool,只用aLoop来accept(2)连接。aLoop上还可以运行几个TcpClient。这些搭配都是可行的,这也正是EventLoop的灵活性所在,可以根据需要在多个线程间调配负载。
本节更新了test8~test11,均支持多线程。
11. Connector 主动发起连接比被动接受连接要复杂一些,一方面是错误处理麻烦,另一方面是要考虑重试。在非阻塞网络编程中,发起连接的基本方式是调用connect(2),当socket变得可写时表明连接建立完毕。当然这其中要处理各种类型的错误,因此我们把它封装为Connector
class。接口如下:
1 2 3 4 5 6 7 8 9 10 11 12 class Connector : boost::noncopyable {public :typedef boost::function<void (int sockfd)> NewConnectionCallback;Connector (EventLoop* loop, const InetAddress& serverAddr);Connector ();void setNewConnectionCallback (const NewConnectionCallback& cb) void start () void restart () void stop ()
Connector只负责建立socket连接 ,不负责创建TcpConnection,它的NewConnectionCallback回调的参数是socket文件描述符。以下是一个简单的测试(s11/test12.cc),它会反复尝试直至成功建立连接。
1 2 3 4 5 6 7 8 9 10 11 12 13 14 15 16 muduo::EventLoop* g_loop;void connectCallback (int sockfd) printf ("connected.\n" );quit ();int main (int argc, char * argv[]) muduo::InetAddress addr ("127.0.0.1" , 9981 ) ;muduo::ConnectorPtr connector (new muduo::Connector(&loop, addr)) ;setNewConnectionCallback (connectCallback);start ();loop ();
Connector的实现有几个难点:
socket是一次性的,一旦出错(比如对方拒绝连接),就无法恢复,只能关闭重来。但Connector是可以反复使用的,因此每次尝试连接都要使用新的socket文件描述符和新的Channel对象。要留意Channel对象的生命期管理,并防止socket文件描述符泄漏。
错误代码与accept(2)不同,EAGAIN是真的错误,表明本机ephemeral
port暂时用完,要关闭socket再延期重试。“正在连接”的返回码是EINPROGRESS。
另外,即便出现socket可写,也不一定意味着连接已成功建立,还需要用getsockopt(sockfd,
SOL_SOCKET, SO_ERROR, :.)再次确认一下。
重试的间隔应该逐渐延长,例如0.5s、1s、2s、4s,直至30s,即back-off。这会造成对象生命期管理方面的困难,如果使用EventLoop::runAfter()定时而Connector在定时器到期之前析构了怎么办?本节的做法是在Connector的析构函数中注销定时器。
要处理自连接(self-connection)。出现这种状况的原因如下。在发起连接的时候,TCP/IP协议栈会先选择source
IP和source port,在没有显式调用bind(2)的情况下,source
IP由路由表确定,source port由TCP/IP协议栈从local port
range°中选取尚未使用的port(即ephemeral port)。如果destination
IP正好是本机,而destination port位于local port
range,且没有服务程序监听的话,ephemeral port可能正好选中了destination
port,这就出现(source IP, source port) = (destination IP, destination
port)的情况,即发生了自连接。处理办法是断开连接再重试,否则原本侦听destination
port的服务进程也无法启动了。
11.1 TimerQueue::cancel
\(\S8.2\) 实现的TimerQueue不能注销定时器,本节补充这一功能。TimerQueue::cancel()的一种简单实现是用shared_ptr来管理Timer对象,再将TimerId定义为weak_ptr,这样几乎不用我们做什么事情。在C++11中应该也足够高效,因为shared_ptr具备移动语义,可以做到引用计数值始终不变,没有原子操作的开销。但用shared_ptr来管理Timer对象似乎显得有点小题大做,而且这种做法也有一个小小的缺点,如果用户一直持有TimerId,会造成引用计数所占的内存无法释放,而本节展示的做法不会有这个问题。
本节采用更传统的方式,保持现有的设计,让TimerId包含Timer*。但这是不够的,因为无法区分地址相同的先后两个Timer对象。**因此每个Timer对象有一个全局递增的序列号int64_t
sequence_(用原子计数器AtomicInt64生成),TimerId同时保存Timer*和sequence_,这样TimerQueue::cancel()就能根据TimerId找到需要注销的Timer对象。**
1 2 3 4 5 6 7 8 9 10 11 12 13 14 15 16 class Timer : boost::noncopyable {public :Timer (const TimerCallback& cb, Timestamp when, double interval)callback_ (cb), expiration_ (when), interval_ (interval),repeat_ (interval > 0.0 ),sequence_ (s_numCreated_.incrementAndGet ()) {}private :const TimerCallback callback_;const double interval_;const bool repeat_;const int64_t sequence_;static AtomicInt64 s_numCreated_;
TimerQueue新增了cancel接口函数,这个函数是线程安全的。
cancel()有对应的cancelInLoop()函数,因此TimerQueue不必用锁。TimerQueue新增了几个数据成员,activeTimers_.保存的是目前有效的Timer的指针,并满足invariant:timers_.size()=activeTimers_.size(),因为这两个容器保存的是相同的数据,只不过timers_是按到期时间排序,activeTimers_是按对象地址排序。
1 2 3 4 5 6 7 8 9 10 11 12 13 14 15 class TimerQueue : boost::noncopyable {public :void cancel (TimerId timerId) private :typedef std::pair<Timestamp, Timer*> Entry;typedef std::set<Entry> TimerList;typedef std::pair<Timer*, int64_t > ActiveTimer;typedef std::set<ActiveTimer> ActiveTimerSet;void addTimerInLoop (Timer* timer) void cancelInLoop (TimerId timerId) bool callingExpiredTimers_;
由于TimerId不负责Timer的生命期,其中保存的Timer*可能失效,因此不能直接dereference,只有在activeTimers_中找到了Timer时才能提领 。注销定时器的流程如下,照例用EventLoop::runInLoop()将调用转发到IO线程:
1 2 3 4 5 6 7 8 9 10 11 12 13 14 15 16 17 18 19 void TimerQueue::cancel (TimerId timerId) runInLoop (boost::bind (&TimerQueue::cancelInLoop, this , timerId));void TimerQueue::cancelInLoop (TimerId timerId) assertInLoopThread ();assert (timers_.size () == activeTimers_.size ());ActiveTimer timer (timerId.timer_, timerId.sequence_) ;find (timer);if (it != activeTimers_.end ()) {size_t n = timers_.erase (Entry (it->first->expiration (), it->first));assert (n == 1 ); (void )n;delete it->first; erase (it);else if (callingExpiredTimers_) {insert (timer);assert (timers_.size () == activeTimers_.size ());
上面这段代码中的cancelingTimers_和callingExpiredTimers_是为了应对“自注销”这种情况,即在定时器回调中注销当前定时器:
1 2 3 4 5 6 7 8 9 10 11 12 13 14 muduo::EventLoop* g_loop;void cancelSelf () printf ("cancelSelf\n" );cancel (toCancel);int main () runEvery (5 , cancelSelf);loop ();
当运行到cancelSelf()的时候,toCancel代表的Timer已经不在timers_和activeTimers_这两个容器中,而是位于expired中。为了应对这种情况,TimerQueue会记住在本次调用到期Timer期间有哪些cancel()请求,并且不再把已cancel()的Timer添加回timers_和activeTimers_当中。
1 2 3 4 5 6 7 8 9 10 11 12 13 14 15 16 17 18 19 20 21 22 23 24 25 26 27 28 29 30 31 32 33 void TimerQueue::handleRead () assertInLoopThread ();Timestamp now (Timestamp::now()) ;readTimerfd (timerfd_, now);getExpired (now);true ;clear ();for (std::vector<Entry>::iterator it = expired.begin (); end (); ++it) {run ();false ;reset (expired, now);void TimerQueue::reset (const std::vector<Entry>& expired, Timestamp now) for (std::vector<Entry>::const_iterator it = expired.begin ();end (); ++it) {ActiveTimer timer (it->second, it->second->sequence()) ;if (it->second->repeat () && find (timer) == cancelingTimers_.end ()) {restart (now);insert (it->second);else {delete it->second;
注意TimerQueue在执行run()时没有检查Timer是否已撤销,这是因为TimerQueue::cancel()并不提供strong
guarantee。TimerQueue::getExpired()和TimerQueue::insert()均增加了与activeTimers_有关的处理,此处从略。
12. TcpClient 有了Connector,TcpClient就不难实现了,它的代码与TcpServer甚至有几分相似(都有newConnection和removeConnection这两个成员函数),只不过每个TcpClient只管理一个TcpConnection 。代码从略,此处谈几个要点:
TcpClient具备TcpConnection断开之后重新连接的功能,加上Connector具备反复尝试连接的功能,因此客户端和服务端的启动顺序无关紧要。可以先启动客户端,一旦服务端启动,半分钟之内即可恢复连接(由Connector::kMaxRetryDelayMs常数控制);在客户端运行期间服务端可以重启,客户端也会自动重连。
连接断开后初次重试的延迟应该有随机性,比方说服务端崩溃,它所有的客户端连接同时断开,然后0.5s之后同时再次发起连接,这样既可能造成SYN丢包,也可能给服务端带来短期大负载,影响其服务质量。因此每个TcpClient应该等待一段随机的时间(0.5~2s),再重试,避免拥塞。
发起连接的时候如果发生TCP
SYN丢包,那么系统默认的重试间隔是3s,这期间不会返回错误码,而且这个间隔似乎不容易修改。如果需要缩短间隔,可以再用一个定时器,在0.5s或1s之后发起另一次连接。如果有需求的话,这个功能可以做到Connector中。
目前本节实现的TcpClient没有充分测试动态增减的情况,也就是说没有充分测试TcpClient的生命期比EventLoop短的情况,特别是没有充分测试TcpClient在连接建立期间析构的情况。编写这方面的单元测试多半要用到S12.4介绍的技术。
目前muduo
0.8.0采用shared_ptr来管理Connector,因为在编写这部分代码的时候TimerQueue尚不支持cancel()操作。将来muduo
1.0会在充分测试的前提下改用这里展示的简洁的实现。
13. epoll epoll(4)是Linux独有的高效的IO
multiplexing机制,它与poll(2)的不同之处主要在于poll(2)每次返回整个文件描述符数组,用户代码需要遍历数组以找到哪些文件描述符上有IO事件,而epoll_wait(2)返回的是活动fd的列表, 需要遍历的数组通常会小得多。在并发连接数较大而活动连接比例不高时,epoll(4)比poll(2)更高效。
本节我们把epoll(4)封装为EPoller class,它与\(\S8.1.2\) 的Poller
class具有完全相同的接口。muduo实际的做法是定义Poller基类并提供两份实现PollPoller和EPoller。这里为了简单起见,我们直接修改EventLoop,只需把代码中的Poller替换为EPoller。
EPoller的关键数据结构如下,其中events_不是保存所有关注的fd列表,而是一次epoll_wait(2)调用返回的活动fd列表,它的大小是自适应的。
1 2 typedef std::vector<struct epoll_event> EventList;typedef std::map<int , Channel*> ChannelMap;
1 2 3 4 5 6 7 8 9 10 11 struct epoll_event {uint32_t events; epoll_data_t data;typedef union epoll_data {void *ptr;int fd;uint32_t u32;uint64_t u64;epoll_data_t ;
为了减少转换,muduo
Channel没有自已定义IO事件的常量,而是直接使用poll(2)的定义(POLLIN、POLLOUT等等),在Linux中它们和epoll(4)的常量相等。
1 2 3 4 5 6 BOOST_STATIC_ASSERT (EPOLLIN == POLLIN);BOOST_STATIC_ASSERT (EPOLLPRI == POLLPRI);BOOST_STATIC_ASSERT (EPOLLOUT == POLLOUT);BOOST_STATIC_ASSERT (EPOLLRDHUP == POLLRDHUP);BOOST_STATIC_ASSERT (EPOLLERR == POLLERR);BOOST_STATIC_ASSERT (EPOLLHUP == POLLHUP);
EPoller::poll()的关键代码如下。&*events_.begin(),在C++11中可写为events_.data()。events_.resize(events_.size() * 2);表示如果当前活动fd的数目填满了events_,那么下次就尝试接收更多的活动fd。events_的初始长度是16(kInitEventListSize),其会根据程序的IO繁忙程度自动增长,但目前不会自动收缩。
1 2 3 4 5 6 7 8 9 10 11 12 13 14 Timestamp EPoller::poll (int timeoutMs, ChannelList* activeChannels) {int numEvents = ::epoll_wait (epollfd_, begin (), static_cast <int >(events_.size ()), timeoutMs);Timestamp now (Timestamp::now()) ;if (numEvents > 0 ) {" events happened" ;fillActiveChannels (numEvents, activeChannels);if (implicit_cast <size_t >(numEvents) == events_.size ()) {resize (events_.size () * 2 );return now;
EPoller::fillActiveChannels的功能是将events_中的活动fd填入activeChannels,其中L7~L10是在检查invariant。
1 2 3 4 5 6 7 8 9 10 11 12 13 14 void EPoller::fillActiveChannels (int numEvents, ChannelList activeChannels) const assert (implicit_cast <size_t >(numEvents) <= events_.size ());for (int i = 0 ; i < numEvents; ++i) {static_cast <Channel*>(events_[i].data.ptr);#ifndef NDEBUG int fd = channel->fd ();find (fd);assert (it != channels_.end ());assert (it->second == channel);#endif set_revents (events_[i].events);push_back (channel);
updateChannel()和removeChannel()的代码从略。因为epoll是有状态的,因此这两个函数要时刻维护内核中的fd状态与应用程序的状态相符,Channel::index()和Channel::set_index()被挪用为标记此Channel是否位于epoll的关注列表之中。这两个函数的复杂度是O(logN),因为Linux内核用红黑树来管理epoll关注的文件描述符清单。
测试程序无须修改,全都已经自动用上了epoll(4)。
至此,一个基于事件的非阻塞TCP网络库已经初具规模。
14. 测试程序一览 本章简要介绍了muduo的实现过程,是一个具有教学示范意义的项目,希望有助于读者理解one
looper
thread这一编程模型背后的实现,在运用时更加得心应手。如果对本章代码有疑问,应该以最新版的muduo源码为准。
当然可以,以下是转换后的文本:
本节没有配套代码,以下列出前面各节出现的测试代码的功能:
\(\S8.0\)
s00/test1.cc在两个线程里各自运行一个EventLoop。\(\S8.0\)
s00/test2.cc试图在非IO线程调用EventLoop::loop(),程序崩溃。\(\S8.1\)
s01/test3.cc用channel关注timerfd的可读事件。\(\S8.2\) s02/test4.cc
TimerQueue示例。\(\S8.3\) s03/test5.cc
IO线程调用EventLoop::runInLoop()和EventLoop::runAfter()。\(\S8.3\) s03/test6.cc
跨线程调用EventLoop::runInLoop()和EventLoop::runAfter()。\(\S8.4\) s04/test7.cc
Acceptor示例。\(\S8.5\) s05/test8.cc
discard服务。\(\S8.8\) s08/test9.cc
echo服务。\(\S8.8\) s08/test10.cc
发送两次
数据,测试TcpConnection::send()。
\(\S8.9\) s09/test11.cc
chargen服务,使用writeCompleteCallback。\(\S8.11\) s11/test12.cc
Connector示例。\(\S8.12\) s12/test13.cc
TcpClient示例。
本章Acceptor、Connector、Reactor等术语是Douglas
Schmidt发明的,他的原始论文出处是: